![Reliable Horsepower logo-CMYK-all black.png]](https://kb.reliablehp.com/hs-fs/hubfs/Reliable%20Horsepower%20logo-CMYK-all%20black.png?height=50&name=Reliable%20Horsepower%20logo-CMYK-all%20black.png)
Toolkit is the diagnostics and development software used with the PG+ fueling system. This allows users to connect to an ECU to configure and calibrate, troubleshoot and program/reprogram. The purpose of this document is to document the installation and setup process for Toolkit. For more information on Toolkit usage, see the following articles:
A video version of this document can be found below "Toolkit Install and Setup":
Note: Toolkit will still be required to communicate with engines that have the PG+ fueling system in a site-certifiable configuration.
Required Hardware
In addition to the software, there are two part numbers for hardware that are required:
- Kvaser Interface Cable Kit WWA0554041259. This kit previously contained two components:
- 5404-1259 – Kvaser Leaf Light v2 CAN to USB converter
- 5405-1192 – CAN1 Adapter

- Interface Cable Adapter, CAN2 CEA55115241Q

The SECM70 ECU used in the PG+ fueling system utilizes two CAN networks; CAN1 for the control panel communication and CAN2 for Toolkit communication. The above hardware set has communication interface adapters for both networks. In order for Toolkit to connect to an ECU, adapter CEA55115241Q must be used. In the diagnostic connector C18, CAN1 is populated positions J & K and CAN2 is populated in positions C & D. Below is the pinout for the CAN-related wires on the diagnostic connector C18:


| Circuit designation | Connection Pin Position | Description |
| CAN2+ | C | CAN2 High |
| CAN2- | D | CAN2 Low |
| CAN1+ | J | CAN1 High |
| CAN1- | K | CAN1 Low |
Software Install and Setup
Minimum System Requirements:
- Microsoft Windows 10, 8.1, 7, Vista (32 & 64 bit)
- Microsoft .NET Framework 4.5.1 or higher
- 1 GHz or faster x86 or x64 process
- 1 GB of RAM
- Screen Resolution 800 x 600 pixels
- Screen colors: 256
There are four types of files required for communication with an ECU. Each of these files should be placed in their respective directories. The correct file structure is covered later in this document.
- .dll – XCP Security File
- .sid – Service Interface Definition File
- .wtool – PG+ calibration and diagnostic display file
- .wapp – application data file

The file packages (less the .wapp file which is application specific) are available for download in the table below: If the version of ECU software is unknown, either contact Industrial Irrigation for this information or start with the latest ECU software that matches your engine configuration and make corrections after an attempt to connect to the ECU is made.
| File Package Description | Download Link |
| Toolkit v7.5 + files for big block up to v43.15 ECU software | Download Here |
Each of the link above will download a .zip file. After selecting and downloading from one of the links above, navigate to the Downloads folder (or default browser download location) and right click the .zip file > Extract all. Enter the newly created folder and location the Toolkit executable file which will have "9927-1226" in the filename. To install Toolkit, double click executable following the on-screen prompts. Below is a sample executable file for Toolkit v6.6.
![]()
- Agree to the License Terms and Conditions prior to installation
- The installation should not take long; 15-20 seconds maximum. Click ‘Close’ to exit the installation when complete.

The next step is to copy the "ECUFiles" folder to the C: drive. Navigate to the "Toolkit v7.4_Supporting Files" folder downloaded and open it. Contained is the "ECUFiles" folder. Right-click > Copy or Ctrl+C, navigate to the top level C: drive and in the blank space to the right of the folders Right-click > Paste or Ctrl + V.

To point Toolkit to these folders, open Toolkit and navigate to Tools > Options.

1. Select the first line and 2. click modify. Alternatively, the File Types line can be double clicked.

The "Delete" button in the Modify SID File Directories dialogue box is greyed out as there must be at least one file location for the .sid files at all times. It is possible to select multiple locations for .sid files if desired. If the default location is not C:\ECUFiles\Toolkit\Sids_Dll, first add the correct directory then select the undesired directory and click Delete to remove it from the list.
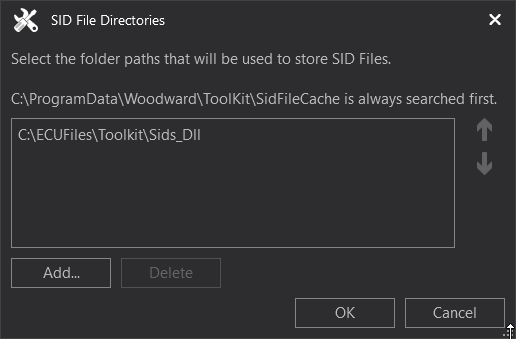
Repeat the above process with the other file types. The .sid file type is the only type that allows for more than one directory to be listed. All other file types allow only a single location by directly opening a "Select Folder" dialogue box. The last directory that needs to be set is the Log Files folder for recordings. Navigate in the Options window > Datalog/Trending Tab. In the middle of the page is the directory; click Browse and select the folder C:\ECUFiles\Toolkit\Log Files. See below screenshow:

Once Toolkit has been redirected, the required files must be placed in their respective locations. Below is a table of file types and their correct locations:
| File Type | Correct Save Location |
| .wapp files | C:\ECUFiles\Toolkit\Wapp |
| .wtool files | C:\ECUFiles\Toolkit\Tools |
| .dll files | C:\ECUFiles\Toolkit\Sids_Dll |
| .sid files | C:\ECUFiles\Toolkit\Sids_Dll |
The next step is to open a Tool (.wtool file) and set up a new connection. This step will require an online connection to an ECU. This can be accomplished by connecting the interface cable and adapter to an engine wire harness and ECU. If the wire harness is on an engine, it must have the ability to be powered up without starting the engine.
With Toolkit closed, plug in the Kvaser interface cable is plugged into the PC and ensure the drivers successfully installed.
Open Toolkit and click ‘Open Tool’ and navigate to the desired .wtool file. At the time of this document’s creation, the Service Tool is named "PGPlus_Service_v3_4.wtool", however, updates are periodic so the version number will be updated. There are three methods open the Connect dialog box:
- Main > Connect
- Connect icon in the upper right corner of the screen as outlined below:
- Keyboard shortcut Alt + o

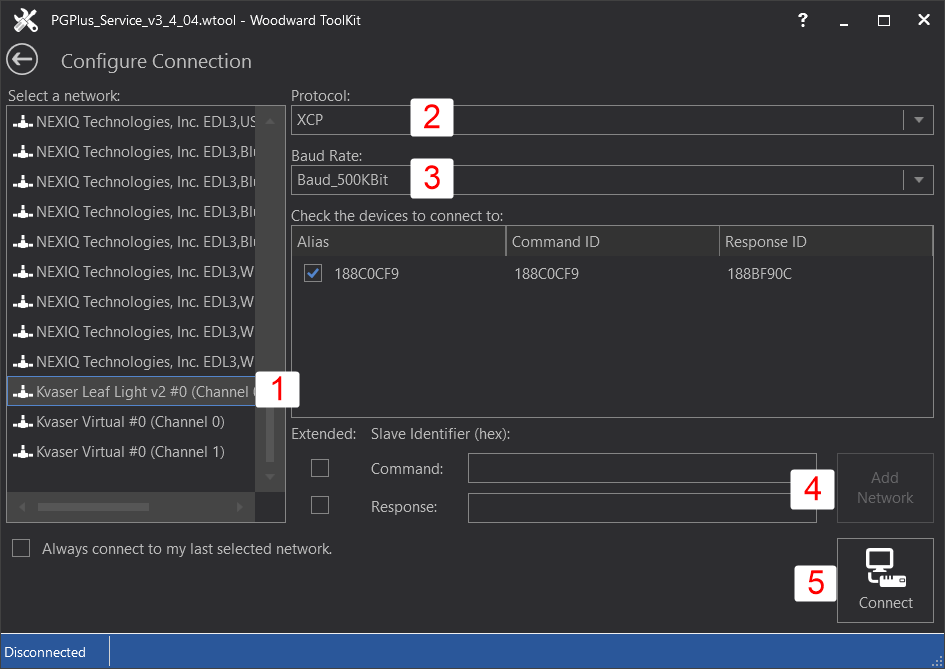
By default, the Connect dialog box will look like the below:

Note: If the Kvaser cable is plugged in after Toolkit is already open, it will not recognize the cable is present. This can be determined by looking at the Select a network list. If "Kvaser Leaf Light v2 #0" or ""Kvaser Leaf Light v3 #0" is not listed, Toolkit is not recognizing the Kvaser cable is plugged in. To fix this issue, leave the Kvaser cable plugged in and close and re-open Toolkit.
The live connection will only need to be configured once after which Toolkit will remember the settings for future live connections. To set up the connection, choose the following options:
- Choose "Kvaser Leaf Light v2 #0" or ""Kvaser Leaf Light v3 #0" in the Network section. Depending on the drivers already installed, this list may be fairly long
- Set the Protocol to "XCP"
- Set the Baud Rate to "Baud_500kbit"
- Below the Extended: Slave Identifier (hex): heading, check the boxes next to Command and Response. Enter 188C0CF9 in the Command text box and 188BF90C in the Response text box and click Add Network. An Alias will be created as shown below.
- Click "Connect"
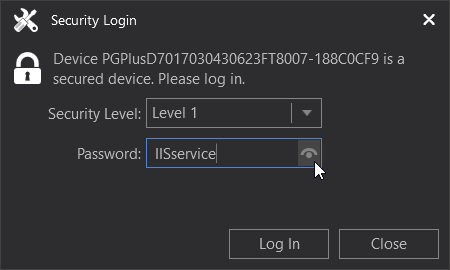
After clicking "Connect", a security login dialogue box should display. If it doesn’t, or another error message appears, it is likely Toolkit is not seeing the correct .sid and/or security files. First verify the file paths for each of these files and also ensure the files are in the specified directories. If the correct .sid or security file is not available, contact Industrial Irrigation for assistance.
The password for the Level 1 security level is "IISservice". Click Log In to establish a live connection.
The main screen should now be displaying live data.
